
Features in Purchase Orders
Let's explore the various features available in the Purchase Orders module.
Marking a Bill as Paid
Marking an order as paid confirms that the payment has been completed and updates the order status. This action helps maintain accurate records and ensures clear visibility into your financial activities.
Steps to Mark a Bill as Paid
- Go to Purchases > Bill.
- Select the Bill that you wish to mark as paid.
- Click the Mark As Paid button in the Action options dropdown on the right details section.
- A sidebar will open and prompt you to fill in the following fields:
- Transaction Date: Select the date you wish to set as the payment date.
- Bank Account: Choose the account type from the dropdown menu.
- Remark: Add a remark for your reference.
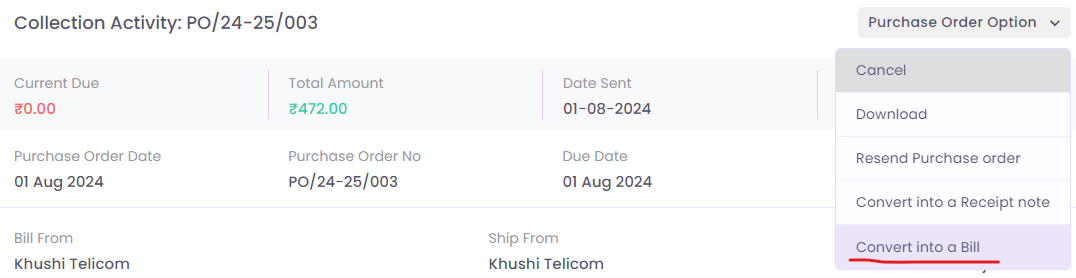
Convert Purchase Order to Bill
Scenario: Ramesh creates a purchase order for the necessary items and sends it to Mehta, his vendor. Mehta accepts the purchase order and delivers the items along with a bill. Instead of manually entering a new bill, Ramesh uses Accosis's accounting software to convert the existing purchase order into a bill. This efficient process ensures accurate record-keeping and timely payment to Mehta.
To convert a Purchase Order to a Bill:
- Go to Purchases > Purchase Order.
- Select the Purchase Order that you wish to convert to a bill.
- Click the Convert into a Bill button in the Purchase Order options dropdown on the right details section.
Convert Purchase Order to Bill
- On the New Bill page, enter the required details and save it.
Convert Purchase Order into a Receipt Note
Converting a transaction into a receipt note allows you to document and acknowledge the receipt of goods or services. This feature ensures that all received items are accurately recorded and provides a clear record of the transaction. It helps maintain organized and accurate financial documentation.
To Convert Purchase Order into a Receipt Note:
- Go to Purchases > Purchase Order.
- Select the Purchase Order that you wish to convert to a bill.
- Click the Convert into a Receipt Note button in the Purchase Order options dropdown on the right details section.